
更新日: 2020-05-01
今回は、VRコンテンツをHTML風に簡単に書けるA-Frameを使って、WordPress記事内に作成した3Dコンテンツにアニメーションをつけてみようと思います!どれも簡単に書けるので試してみると面白いとおもいます!
ちなみに、A-Frameでアニメーションを記述する際には、<a-entity> にプロパティとして記述する方法と、<a-animation>というタグを使う方法がありますが、後者はdeprecateとなっており<a-entity>を使ったほうがよいです。
バージョン0.9.0の公式ドキュメントでは、Core API一覧からanimationは削除され、components一覧に記載されるようになっています。
Entityの準備
今回は以下のように2つの平面(plane)を準備します。コードを以下のような感じです。この赤色の平面に対して、アニメーションを付けて行きたいと思います。
また、マウスオーバー時のアニメーションを記述するために、camera(<a-camera>の部分)も準備しておきます。※マウス操作が不要なアニメーションについてはマウス操作を無効にしています。
<a-scene embedded>
  <a-entity
    geometry="primitive: plane; height: 5; width: 5"
    material="color: red"
    position="0 0 -10"
    rotation="0 0 0">
  </a-entity>
  <a-entity
    geometry="primitive: plane; height: 30; width: 30"
    material="color: green"
    position="0 -3 0"
    rotation="-90 45 0">
  </a-entity>
  <a-sky
    color="#ECECEC">
  </a-sky>
  <a-camera>
    <a-cursor></a-cursor>
  </a-camera>
</a-scene>
上のコードを書いてブラウザで見てみるとだいたい以下のような感じになります。中央の黒い○がcameraで、この位置にマウスのカーソルがあるとみなされます。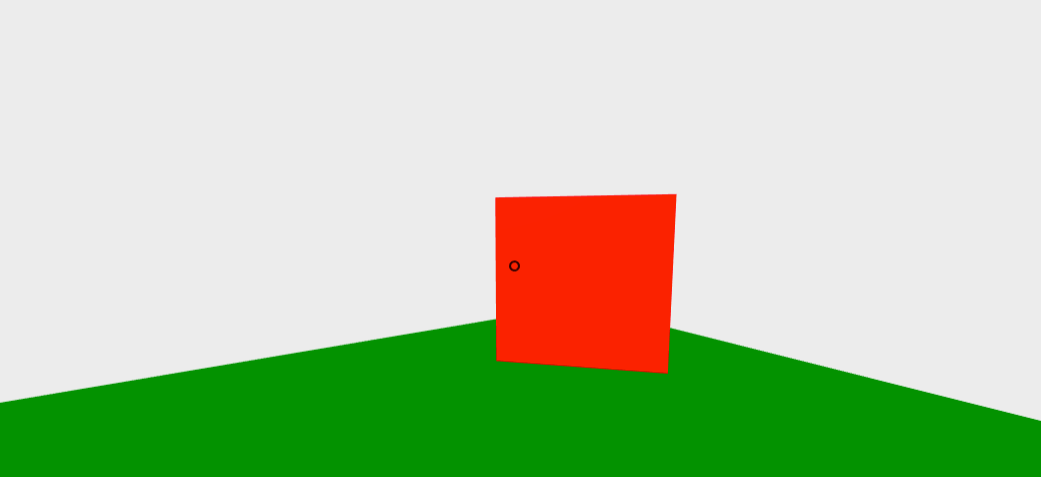
A-Frameでは、以下のようなアニメーションであれば簡単に付与することができます!
上下左右に動かす
animation属性の値にobject3D.position.(x|y|z)を指定して、toに動かす位置を指定します。dir: alternate および loop: trueを指定することで、無限に動かし続けることができます。
dir: alternate では、元の位置(もしくはfromで指定した位置)〜 toの位置 〜 元の位置 というように繰り返しの動きを表現しています。
上下に動かす
<a-entity
  geometry="primitive: plane; height: 5; width: 5" material="color: red"
  position="0 0 -10"
  rotation="0 0 0"
  animation="property: object3D.position.y;
             to: 2.0;
             dir: alternate;
             dur: 1000;
             loop: true">
</a-entity>
左右に動かす
<a-entity
  geometry="primitive: plane; height: 5; width: 5"
  material="color: red"
  position="0 0 -10"
  rotation="0 0 0"
  animation="property: object3D.position.x;
             to: 2.0;
             dir: alternate;
             dur: 1000;
             loop: true">
</a-entity>
positionで座標指定することもできます。
<a-entity
  geometry="primitive: plane; height: 5; width: 5"
  material="color: red"
  position="0 0 -10"
  rotation="0 0 0"
  animation="property: position;
             to: -2 -2 -10;
             dir: alternate;
             dur: 1000;
             loop: true">
</a-entity>
繰り返しの動きで、切り返し時もなめらかに動かしたい場合は、easingを使います。上と見比べると違いがわかると思います。easingを使ったほうが動きが自然ですね!
<a-entity
  geometry="primitive: plane; height: 5; width: 5"
  material="color: red"
  position="0 0 -10"
  rotation="0 0 0"
  animation="property: position;
             to: -2 -2 -10;
             dir: alternate;
             dur: 1000;
             loop: true;
             easing: easeInOutSine">
</a-entity>
回転させる
回転させるには、rotationを使います。from, to にはそれぞれの座標軸ごとに回転させたい角度を指定します。
<a-entity
  geometry="primitive: plane; height: 5; width: 5"
  material="color: red"
  position="0 0 -10"
  rotation="0 0 0"
  animation="property: rotation;
             from: 0 0 0;
             to: 0 0 360;
             dir: alternate;
             dur: 1000;
             loop: true;
             easing: easeInOutSine">
</a-entity>
拡大・縮小させる
拡大・縮小には、property: scaleを使います。toには、x, y, z軸それぞれの倍率を指定します。
<a-entity
  geometry="primitive: plane; height: 5; width: 5"
  material="color: red"
  position="0 0 -10"
  rotation="0 0 0"
  animation="property: scale;
             dur: 2000;
             to: 1.5 1.5 1.5;
             dir: alternate;
             loop: true">
</a-entity>
点滅させる
property: visibleを使えば、entityを見えなくすることができます。それをloopさせることで点滅しているように見せることができます。
<a-entity
  geometry="primitive: plane; height: 5; width: 5"
  material="color: red"
  position="0 0 -10"
  rotation="0 0 0"
  animation="property: visible;
             from: false;
             to: true;
             dir: alternate;
             dur: 1000;
             delay: 1000;
             loop: true">
</a-entity>
しかし、少し動きが急でもっと緩やかに消したい場合もあるかと思います。true/falseの値にはeasingがうまく働かないので、そういうときは以下のようにmaterial.opacityを使うとよいです。materialの部分にtransparent: trueを足す必要があるので注意です。
<a-entity
  geometry="primitive: plane; height: 5; width: 5"
  material="color: red; transparent: true"
  position="0 0 -10"
  rotation="0 0 0"
  animation="property: components.material.material.opacity;
             from: 0;
             to: 1;
             dir: alternate;
             dur: 1000;
             loop: true">
</a-entity>
マウスオーバー時に動かす
マウスオーバーをトリガにしてアニメーションを動作させる場合には、startEvents: mouseenter および startEvents: mouseleaveを使います。
以下の例では2つのアニメーションを記述して、マウスオーバー時に平面を1.2倍に拡大、マウスリーブ時に元に戻すように書いています。アニメーションを2つ以上記述する場合には、animation__xxxxのように属性名がユニークになるようにする必要があります。
<a-entity
  geometry="primitive: plane; height: 5; width: 5"
  material="color: red"
  position="0 0 -10"
  rotation="0 0 0"
  animation__in="property: scale;
                 dur: 300;
                 to: 1.2 1.2 1.2;
                 startEvents: mouseenter"
  animation__out="property: scale;
                  dur: 300;
                  to: 1 1 1;
                  startEvents: mouseleave">
</a-entity>
マウスオーバー時に色を変える
<a-entity
  geometry="primitive: plane; height: 5; width: 5"
  material="color: red"
  position="0 0 -10"
  rotation="0 0 0"
  animation__in="property: components.material.material.color;
                 type: color;
                 dur: 300;
                 to: blue;
                 startEvents: mouseenter"
  animation__out="property: components.material.material.color;
                  type: color;
                  dur: 300;
                  to: red;
                  startEvents: mouseleave">
</a-entity>
最後に
とりあえずA-Frameの最も基本的なアニメーションの書き方をまとめてみました。
これらのアニメーションを組み合わせて記述すれば少し複雑なアニメーションも作れると思います!
今回は基本的なアニメーションのみでしたが、今後時間があるときに随時追加していきたいと思います。
おすすめ記事

 体験記)注文住宅で後悔のない理想の家②物件見学編 我が家の注文住宅を建てるまでの体験記です。 第二回のこの記事では、不動産屋さんにお世話になり、土地や一戸建てを見学して周ったことについて書きたいと思います。 妻と子供を連れて、かなり多くの物件を見て周りましたが、見て周れば周るほど目が養われていくもので、その地域の […]
 資産性重視!損しないマンション購入のために利用したい「住まいサーフィン」 マンション購入を考えている方は少なからず購入時から売却を意識しているはずです。 住宅ローンを組んでマンションを購入する場合は、売却時のローン残高を完済できなければ売却することはできません。 最悪の場合、突然の転勤が決まったときに 引っ越したくても引っ越せない […]
 家事が全然できない!そんなときに役立つ我が家の超便利育児グッズ6選 「育児がしんどい」「家事が全然できない」と困っているママパパに向けて、我が家で実際に使っている便利育児グッズを紹介したいと思います! 我が家にも待望の長女が生まれてから早4ヶ月! 子育てには日々悪戦苦闘していますが、2、3ヶ月くらいまでが一番バタバタで落ち着かない時 […]
 学資保険契約しました!保険会社選びで気を付けたいこと 我が家でも第一子が生まれてすぐの段階で学資保険の契約をしました! この記事ではどういう目的で我が家は学資保険を契約しようと思ったのか、保険会社を選ぶ際に注意したいことをまとめています。 学資保険を検討している人はぜひ参考にしてください。 学資保険の目的は?
[…]
学資保険契約しました!保険会社選びで気を付けたいこと 我が家でも第一子が生まれてすぐの段階で学資保険の契約をしました! この記事ではどういう目的で我が家は学資保険を契約しようと思ったのか、保険会社を選ぶ際に注意したいことをまとめています。 学資保険を検討している人はぜひ参考にしてください。 学資保険の目的は?
[…] Chromebookはコスパ最高なおすすめノートPC!メリット・デメリットを考察 Chromebookは、安価で動作サクサクのおすすめノートPCです! ノートPCは結構使うけど、実際に使うのはブラウザでのメールやショッピング、ネットサーフィン、Youtubeくらいだ!という人はかなり多いと思います。 そういう人には正直WindowsやMacが入 […]
 二子玉川でおしゃれな隠れ家フレンチを楽しむ! 二子玉川のおしゃれなフレンチビストロ「bistro oeuf oeuf」にディナー!お店の名前は「ビストロ […]